.svg)
How to setup Driftrock inline website forms
Have you or your team asked;
- Can we add a new qualification question to the website form?
- Where did this lead/purchase first hear about us?
- What are my best performing PPC keywords for driving qualified leads?
- How do we increase conversion rate from the website?
Driftrock makes answering and actioning those questions easy with smarter inline forms.
What makes Driftrock inline forms special?
Driftrock's inline forms are build for marketers, by marketers.
Rather than optimising for leads alone, Driftrock helps you capture the data you need to track and optimise marketing campaigns from click through to purchase.
- Capture more leads with elegant, simple to install inline forms.
- Connect Google Analytics to track lead submissions and form-view events as goals in your account.
- Capture Google Analytics UTM parameters with every lead, so that you can track purchases back to the marketing source, campaign, keyword or ad.
- Capture dynamic hidden fields in addition to UTM tracking for further data granularity e.g &pdfname=ultimateguide.
- Effortlessly sync leads to your CRM with our native integrations.
- Once Driftrock starts processing data, you can optionally benefit from our reporting and audience automation to drive further performance improvements.
How to setup Driftrock inline forms
1. Create or login to your Driftrock account.
2. Browse the Lead Capture Library and choose Website Widgets.

3. Give you form a name by clicking the title and choose 'Inline form' for the type.

4. Follow the rest of the steps to customise your form.
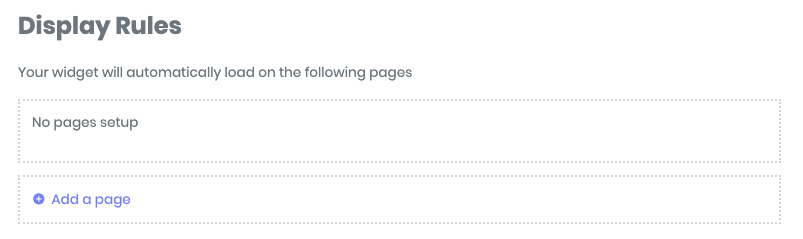
5. When you are ready to install it on your page, add the page you want it to display in the Display Rules section:
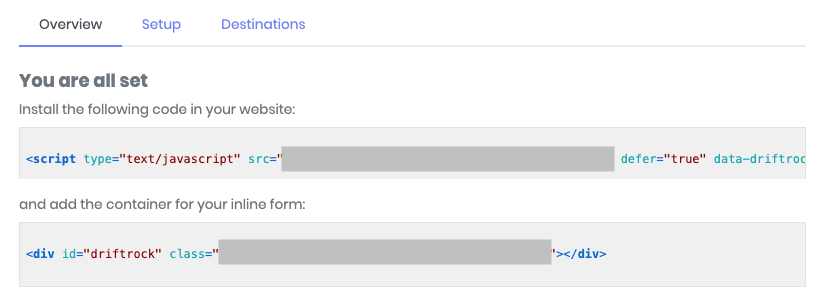
6. You'll need to install the Driftrock site-wide script, which can be found on the 'Overview' tab (check you've not already installed it, as it only needs adding once!). Click "Instructions" to see how.
7. On the Overview tab instructions you'll also find the code you need to insert in the location of the page you want the form to display. Add this to your website page using your website editor.
8. Setup up your Destinations to send data to your CRM.
You can setup your CRM connection to send data from this form to your CRM.
Simply follow the instructions to connect and map fields to your CRM.
You'll notice you also have additional hidden fields available here with Marketing Source, Campaign etc which are the UTM parameters captured automatically with your leads. These can also be mapped to your CRM if desired.
9. Activate your form
To turn on your form and begin collecting leads, switch the Driftrock Capture on in your Captures list;

10. Test!
Make sure you test your form on your web page with a submission or two. You should see the leads in your capture lead log, and in your CRM once you have connected that.
Google Analytics tracking
Optionally connect your Google Analytics account to capture the UTM tracking from Google Analytics automatically with each lead.
Alternatively, adding these manually to your URL's that you use in marketing campaigns will also work without connecting Google Analytics.
Send Dynamic Parameters via Javascript with each lead
You can add static hidden fields to your forms in the Driftrock interface. However, there are times when you may need to send through dynamic parameters from your website.
For example, you might want to install one inline form across many pages, then dynamically send values from each page e.g a Make and Model on an automotive website, or Location and Seller info on a property website.
To do this:
1. When you setup your form, a a special field type called "Load from javascript"
2. In the inline form js snippet you can then add;
hidden_fields: {
your_new_field: 'some value'
}
if you want to add more dynamic fields simply add more fields to the capture and add them to the snippet as well.
For example;
hidden_fields: {
new_field: 'some value',
second_new_field: 'some other value'
}