.svg)
Installing the Facebook Pixel
Arguably, this is the most important part of your Facebook ad account setup. It is central to everything you do in your Facebook marketing, from tracking results, to creating new audiences of people to target.
What is the Facebook pixel?
The Facebook pixel is a small piece of javascript code, that you add to the <head> part of your website.
Why do I need it?
Quite simply, the Facebook pixel is going to prove and also drive the success of your campaigns. Without it, you are shooting in the dark. But why?
With the Facebook pixel installed, you you will be able to:
- track conversions that occur via your Facebook campaigns. And therefore, you are going to be able to attribute conversions to individual campaigns/adsets/ads
- create audiences of people that have triggered individual conversion events. e.g. you could create an audience of people that have completed a purchase, or registered for more information
- create lookalike audiences of people, based on the segments you defined above
- Optimise the delivery of your ads towards people that are likely to complete one of the conversion events that you have defined
- Run Dynamic Product Ads (DPAs), which enables you to show your own live product catalogue to website visitors, directly in their Facebook news feed
How do I install it?
Installing your Facebook pixel is super simple. Head to the Pixels screen of your ad account:
Then click Actions and then View Pixel code from the menu. From the resulting popup, you can copy the pixel code for your ad account. Please note, this pixel code is unique to your ad account:
Tracking Individual Events
If you would also like to track purchases and other events (highly recommended!), then you need to add some additional code to your website.
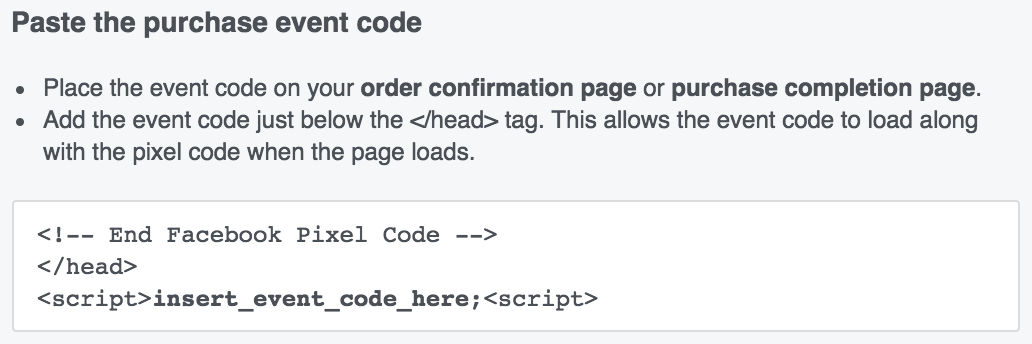
The below additional pieces of code need to go in, after the </head> tag. To give you an example, below is the code for the purchase pixel event, which you can also find in the pixels page of your ad account:
Add this code to the purchase completion page, as per the instructions below:
<script>
fbq('track', 'Purchase');
</script>
For even more advanced installations, follow the installation guide that Facebook provides on the pixels screen of your ad account.


